How to Create Websites
Creating a website can be a challenge to beginners, but it's really easier than you would think. When you see a webpage on the internet (with pictures or colors or words on it), you see the nice side of it. Behind the scenes, the webpage was probably created using coding that isn't exactly nice looking. There are all types of coding out there for building websites (HTML, php, css, etc.), but the most common is HTML. HTML (HyperText Markup Language), is the coding that makes many websites possible. HTML is like a code that you enter, which tells the webpage how to handle words. It's like telling your webpage "Hey, I just typed in this word and now I want that word to be big letters", or "Hey webpage, I just typed in this other word and I want this word to be a link, or I want this word to be the color green." That's basically all HTML is. HTML is very simple to learn but I am not going to waste your time and teach you everything. I will just teach you the basics and how it relates to building a simple website or sales page. Below are the steps you will need to take to set up a professional website so you can start making money from it. The look of a website is very important if you want customers to purchase your product or continue visiting your site.Hosting
You will need to host your website somewhere if you do not already have a host. Websites must be hosted in order to be on the internet for people to see. In this section I will explain how to set up your hosting account for your website. I've used HostGator as an example since they are the most popular web hosting company and one of the cheapest. Most of the web hosts out there use a similar interface so you can shop around and go through whichever host you happen to like and follow these instructions (some things may be different though depending on which host you do choose to go through.) When choosing a website host, you will want to make sure that they are a well known host and make sure they are cheap.Setting Up Your Hosting Account
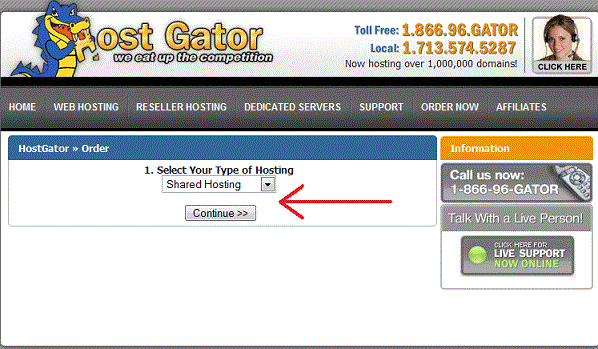
Go to Hostgator and choose "Order Now" from the menu at the top of the screen.
Now choose "Shared Hosting" from the drop down menu (it will probably already be chosen for you by default) and click the "Continue" button.
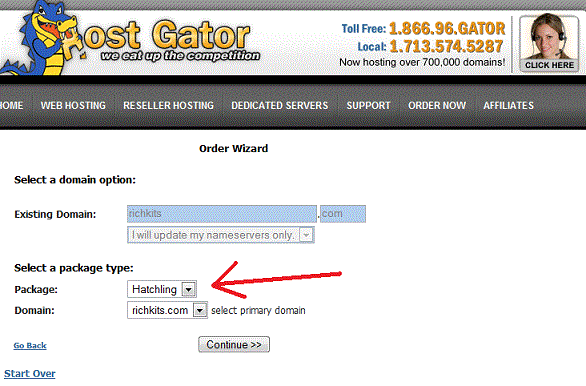
I've already purchased my domain (richkits.com) through GoDaddy since they are cheapest there but if you don't feel like going through the trouble, you can pay twice the amount and register a new domain through HostGator.com.

Next you can choose your hosting package type. Hatchling is the cheapest and has enough features for me so I choose "Hatchling" as the package and then click the "Continue" button. You may choose whichever package you think fits you best. They will all work for what we need to do, and if you are not sure then you should choose the cheapest package, "Hatchling" because I am sure that it is enough for what you will need if you are just starting out.
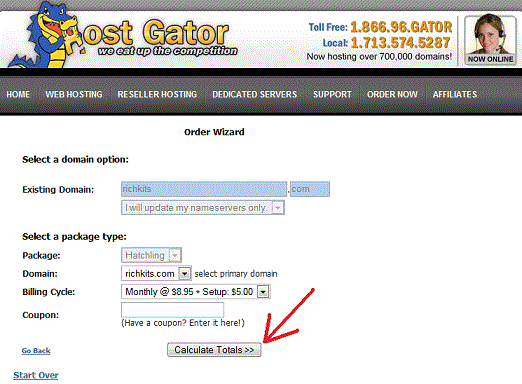
If you have a coupon, you can enter it in the blank box next to "Coupon:". Coupons are just like coupons you would use to buy something in the store. It's like a discount. You can find HostGator coupons online by searching Google for "HostGator Coupons". I usually check DealTaker.com for coupon codes since they seem to update their website more than alot of other websites that offer coupon codes. You can check HERE to see if they have any current coupons so you can save some money. Just copy the code and enter it in the Coupon Box on HostGator's page. Then click "Calculate Totals" to see if it worked. Sometimes coupons are expired or the person who submitted the coupon didn't provide enough information about it so they do not always work.
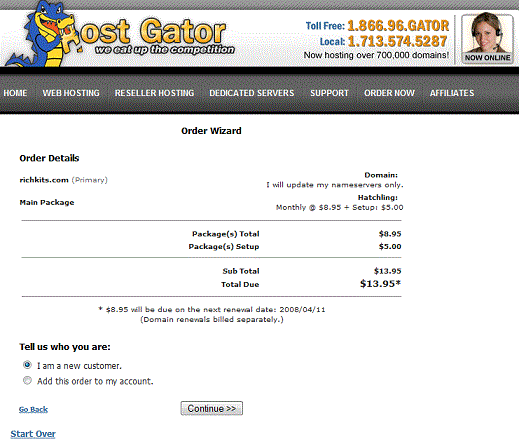
On the next screen, review your order and click the "Continue" button.
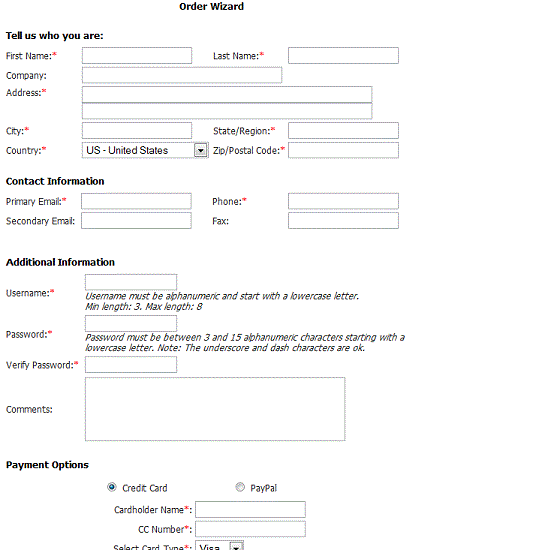
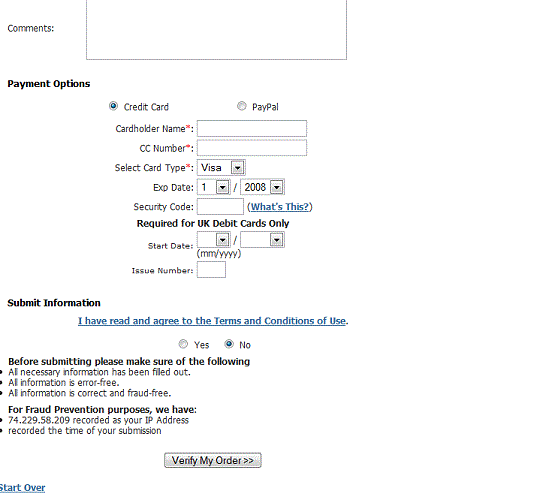
Fill out all the necessary information needed to set up and pay for your account and then click "Verify My Order" when you are finished.
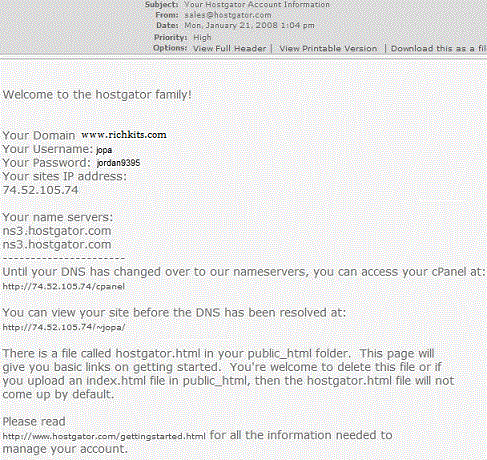
After you have completed the sign up process at HostGator, they will send you an email. Inside the email you will have the following 3 things which you will need to know: Your Username, Your Password, and Your sites IP address.
HTML Editors
Programs which help you to build webpages using HTML are called HTML Editors. These are generally free and you can find which one suits you best by going to Google and searching for "Free HTML Editor". The 2 most popular HTML Editors would be PageBreeze and CoffeeCup. I occassionally use PageBreeze so I will be using PageBreeze as the example for this lesson. HTML Editors are not needed at all to build web pages, and will make learning other coding harder in the long run for you because they make the learning process easy and you may not learn as much as you should if you want to graduate to other types of coding. I recommend that after you learn the basics of HTML, you try building some webpages without using an HTML Editor. But for now I will teach you how to build web pages using PageBreeze, because I think it will be easier to explain how HTML works.PageBreeze
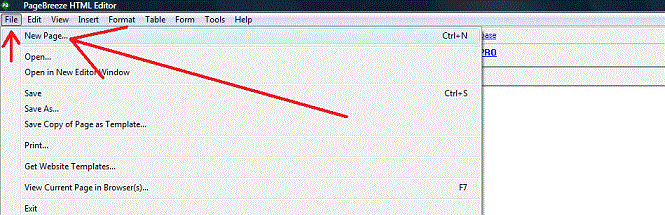
Download PageBreeze (it's free) Here . After downloading and installing on your computer, open PageBreeze. Now click the "File" button which is the upper left-hand corner of the PageBreeze program. After clicking that, choose "New Page..." from the drop down menu to start a new project.
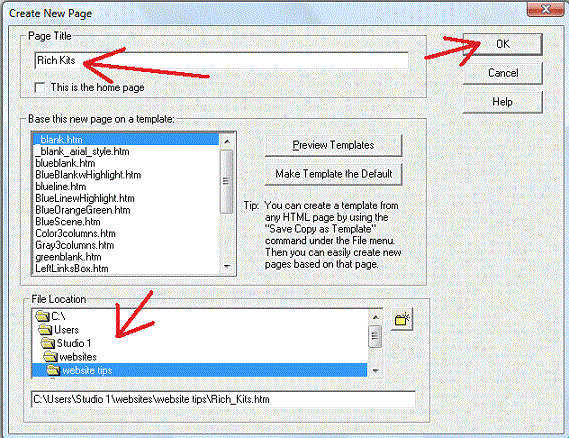
Now the "Create New Page" window will open. Give your page a title under "Page Title". I chose to call my page "Rich Kits". Go to the section that says "File Location" and choose which folder on your computer you want to save your project when you finish. Then, after you have done these 2 things, click the "OK" button to continue.
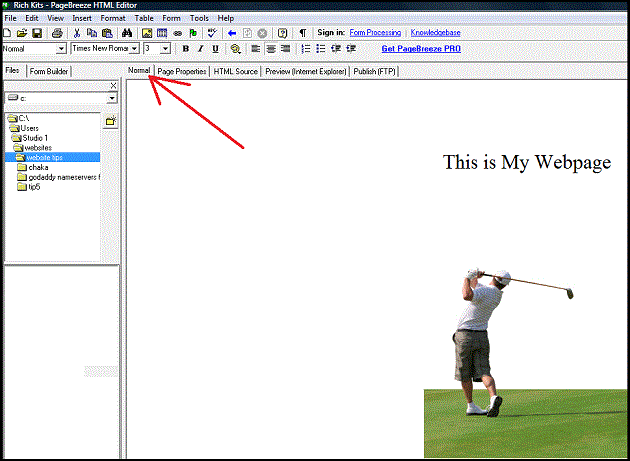
Now you will see a big white window in the middle of the PageBreeze program. Inside this window is where you build your webpage. Everything you see inside this window is what your webpage will look like. PageBreeze has automatically supplied me with the words "Rich Kits", "Heading 2" and "Normal", in the window just as an example to help me get started. You can delete anything in the white box if you see anything like this in your window.
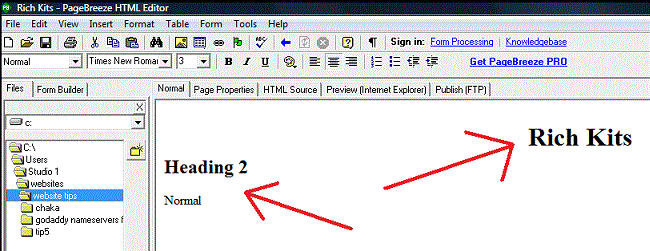
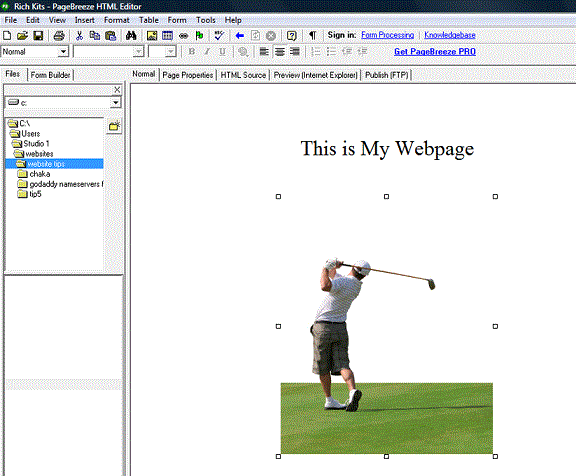
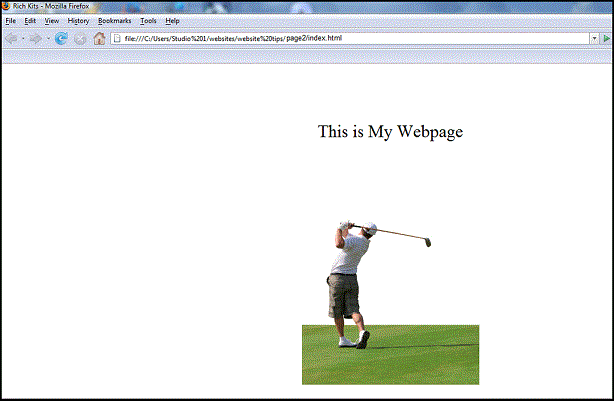
So after deleting what was already in the big white window, I type in my own text. I typed "This is My Webpage" in the white window.
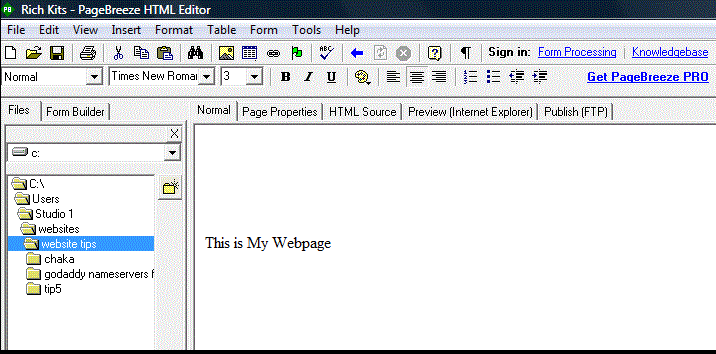
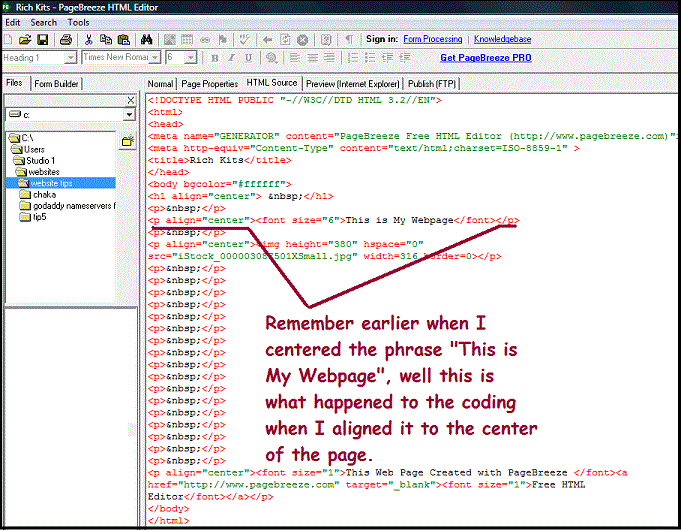
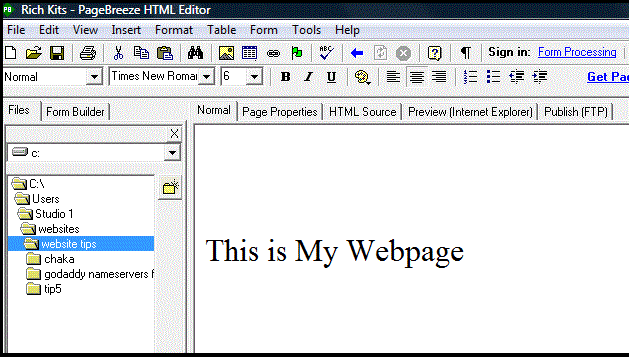
Maybe I want to make these words the title of my page. In this case, I will want to change the size of the words. To do this, I highlight the entire phrase "This is My Webpage" using my mouse, then I change the font size from a "3" to a "6".

Now my original font size is much larger.
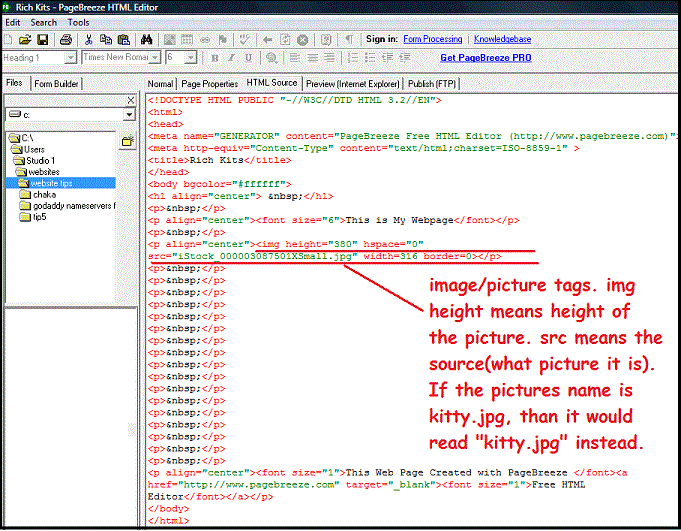
I think you have a basic understanding now on how to build a simple webpage. To change other things on the page, the menu above contains many different options. Just for reference, I have pointed out some of these options. You can add pictures to your webpage by clicking on the picture icon and then finding the folder on your computer where the picture is located. You can change the color of the font (or the background color for the entire page) by choosing the color palette icon. You can center pictures or font in the middle of the page by choosing the centering option in the menu as well.

In the picture below, I have added an image to my webpage and centered it. You can also move images around on the webpage by clicking on them and dragging them with the mouse.
Saving Your Page
When you are ready to save your webpage, go to "File" in the top left part of the screen and choose "Save As..." to choose what type of file you want to save your project as.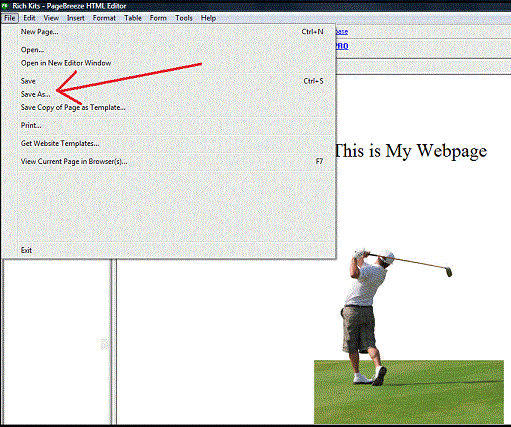
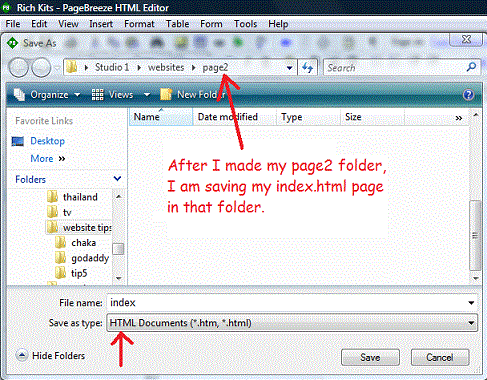
By default, PageBreeze automatically saves files as HTML Documents. You can see this where it says "Save as type:".
This is the correct format for a webpage since most webpages are based on HTML. (Don't worry I will explain HTML later in this guide so you will have a better understanding of what HTML is). For "File name:", choose a file name. To make things easy on yourself, you will want to create a folder for your file and name your file "index.html". Actually, you only have to name it "index" without the .html at the end if it says "Save as type: HTML Documents". It will automatically add the .html at the end, but if you were saving this page without using PageBreeze, you would have to type ".html" after the word "Index" to let the file know that you want it to be an HTML file, not just a normal text file. Now name the folder whatever you want the page name to actually be (You will understand this part later).
I want the page to be called "page2". This is not the main page for my website, I already made that. If this is your main page (the home page for the website), then don't worry about creating a folder, you don't need it. But anytime you are making additional pages for your website, you should create folders and place them in the folders. If this is your main page (home page), just save your index file in any place on your computer that you will remember where you saved it. Ok, so lets summarize what you need to do now..... Name the webpage "index" and name the folder whatever name you want (I'm naming my folder "page2"). But keep in mind that you can't see these pages at those addresses or on the internet until you upload them to your actual website (I will explain this later in the guide as well).

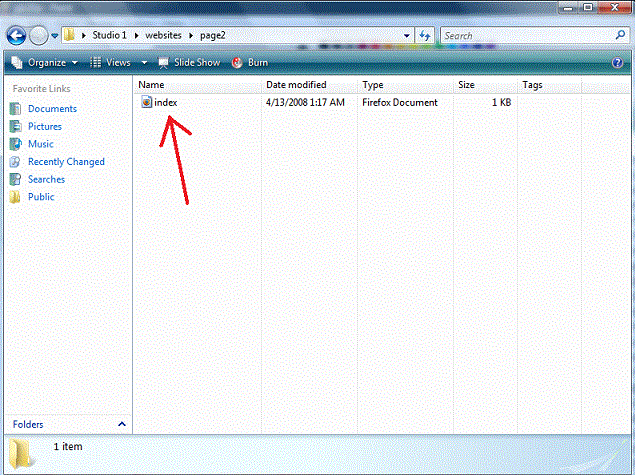
After saving your PageBreeze page, it is automatically saved as an webpage (internet file). Mine is an orange and blue icon because I use Mozilla Firefox to surf the internet and Firefox uses orange and blue as their colors. Maybeyou use Internet Explorer or another type of browser so your webpage's appearance may have a different icon than the one I have. Since I have a Mozilla Firefox icon, that means that when I click on this file and open it, it will open in Mozilla Firefox instead of Internet Explorer or Aol. I located the file by going to the folder where I saved it in PageBreeze (the page2 folder I made earlier).
If I click on the webpage with my mouse, it will open in Mozilla Firefox as a webpage. It is offline so people can not see this on the internet yet. For now, you can only see it on your computer. Next, we will upload it to the internet using an FTP program (Filezilla). If you already have a place to host your website, you can skip the next section titled "Hosting" and continue on to the section below titled "How to Upload to Your Website".
How to Upload to Your Website
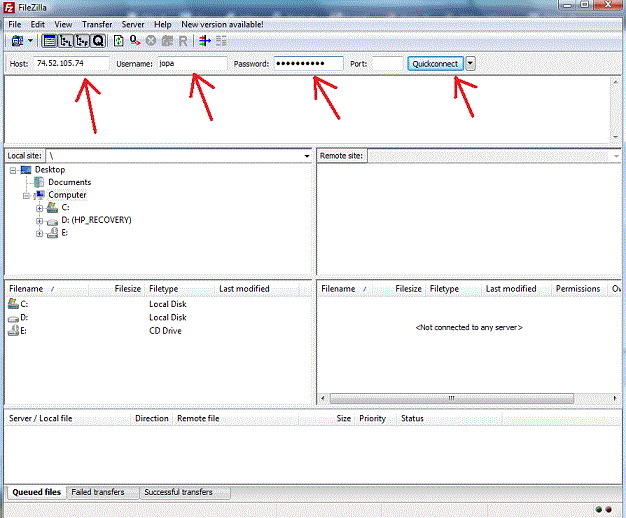
Now you will use Filezilla to upload the web page you made earlier to your website so people can see it on the internet. Filezilla is a program that allows you to upload files and webpages to your website.To connect to your website, use the information which HostGator supplied to you in the email.
Enter Your IP Address for Host Note: You may need to put ".com" at the end of it (without the quotation marks).
Enter your Username
Entere your Password
You can leave Port blank
Click on the "Quick Connect" button.
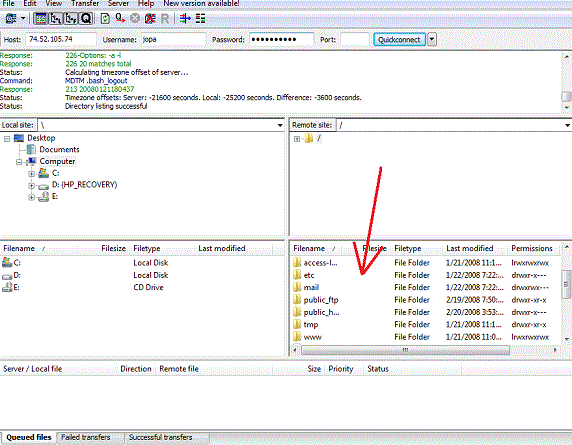
If it was successful, it should say "Directory listing successful" in the big box under where you entered the information.
You should also see a set of folders on the right side of the Filezilla program appear.
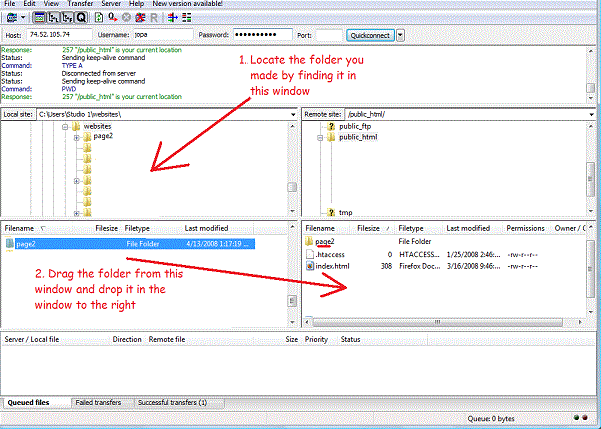
Now the way Filezilla works is this:
In the picture below there is 2 red arrows that are connected.
One points to the box on the left, one points to the box on the right.
The box on the left is your computer and all the folders on your computer.
The box on the right is the internet, your website, and all the folders on your website.
To upload files to your website, you have to drag them from the left box (your computer) to the right box (your website).

After connecting to to your website successfully using Filezilla, the first thing you want to do is locate the folder titled "public_html". It may only say "public_h" until you click on it to read the full title. This folder is located inside the box on the right (your website box). After you find the public_html folder, double click on it to open the folder.
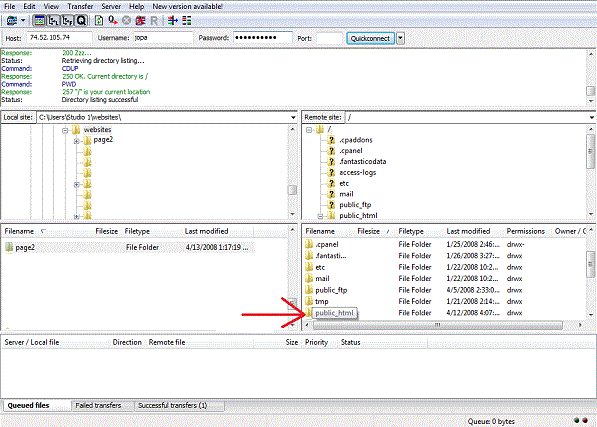
Now, you need to go to the box on the left and use it to find the webpage or folder on your computer that you created earlier. I found my page2 folder in the same folder I saved it in. Next, drag that folder (or webpage if you just created the main page without putting it in a folder) to the box on the left. After dragging the webpage or folder to the box on the left, drop it in that box. So now you just dropped your webpage or folder inside the public_html folder. Now the general public should be able to view your webpage on the internet. If you dragged only a webpage (your home page), then you can find that page at the main address (In my situation, it would be at www.richkits.com). If you dragged a folder, than that is not your main home page and it is a secondary page. Page2 is my secondary page since the index.html webpage is actually inside the page2 folder which I created earlier. So when I dropped the page2 folder into the box on the right (public_html folder), that created a secondary page since I already had a main page. Since the folders name is page2, the webpage I created (the index.html page) can be found at www.YourDomainNameHere.com/secondary
(In my situation, it would be at www.richkits.com/page2 )
Now my webpage is uploaded to my website and I can send people to this page on my website now by telling them to go to www.richkits.com/pagebreeze.

HTML in PageBreeze
You may have noticed the tabs just above the large window that you are working in.The tabs read from left to right "Normal", "Page Properties", "HTML Source", "Preview (Internet Explorer)", "Publish (FTP)".
As you have been creating your webpage and adding font and pictures to it, you have also been changing the coding of the website. Everytime you make a change to your webpage, you also change the HTML coding or the HTML Source as they call it in PageBreeze. If you click on the "HTML Source" tab in PageBreeze, you can view all the coding that is "behind" the webpage. It's very useful to learn how this coding works, but not necessary. You will need to learn HTML to do many things on the internet such as advertising your website, so I highly recommend that you learn basic HTML.
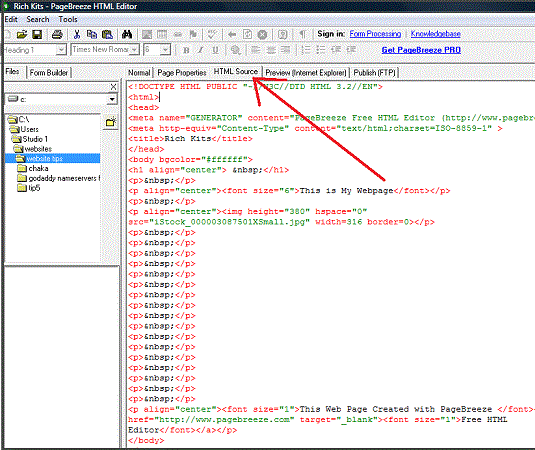
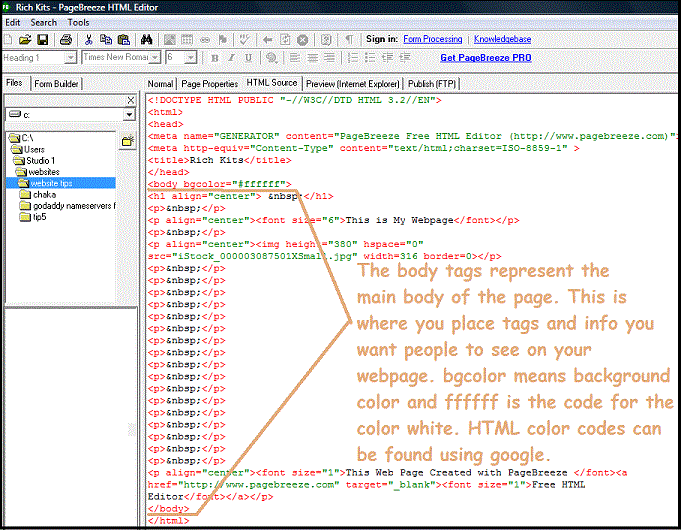
After clicking on the "HTML Source" tab, you can view the HTML Source code. This is the coding "behind" the website and any changes made to this coding will affect the way the normal web page will appear. HTML uses "tags" which are used to define actions. Tags always appear inside the 2 symbols
 . For example, let's say you want to make some text or font on a page bold. In this case you would use the tag
  , since this tag tells the webpage to make whatever follows it Bold.
If you want to change the font's size and make your letters big, you might change the font size by making a tag that reads
 . If you change the "2" in that tag to a larger number like "5" ,so it looks like
  , then the font size will become larger. So if I had the words "This is My Webpage" and wanted to make it bold and larger, then I would need to type the following code into the HTML Source Window
  .
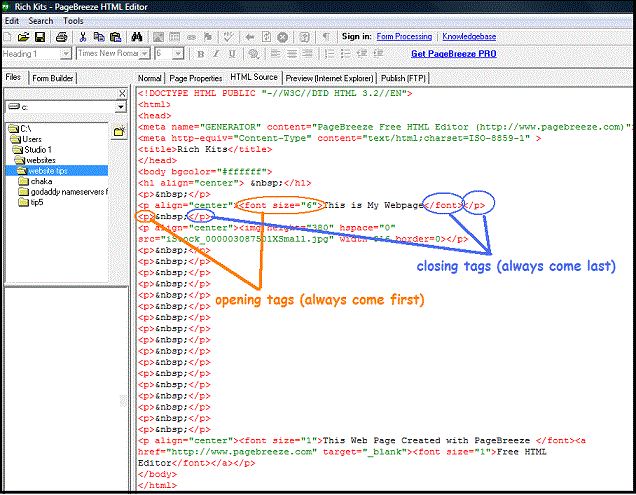
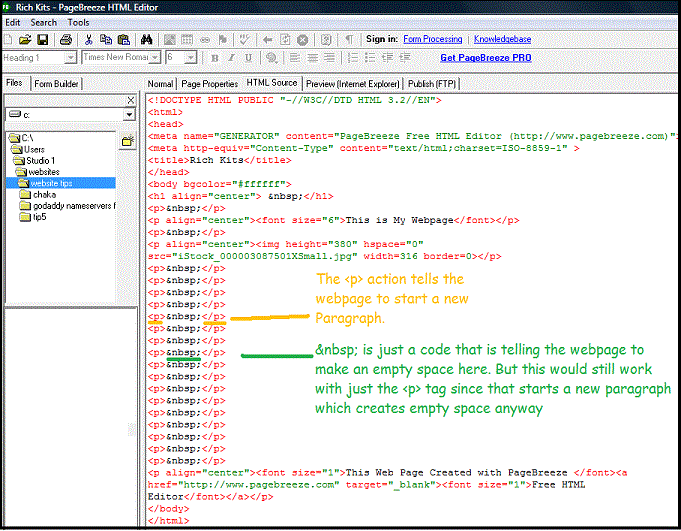
.What I did was added the font size tag and the bold tag BEFORE the words "This is My Webpage", and then I ended the tags AFTER those words by adding 2 more tags with "/" before them. Tags with "/" before the action basically mean that whatever comes after those will not be affected by the actions, only what comes before. They are like closing tags. Tags without "/" are like the opening tags and will always come first. If you don't understand this,just study the HTML Source code of any web page you create in PageBreeze and you will get it or you can also learn more about HTML at HTMLGoodies.com. This is definately the most popular website for learning HTML and it's all free. I used this site when I was learning and I can't count how many times it has helped me. The diagrams below may help you gain a basic understanding of how HTML works.
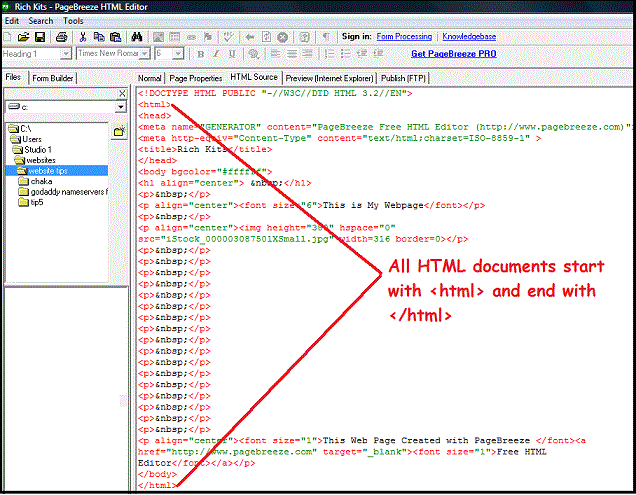
This is HTML code. Nevermind the colors. That's just something PageBreeze does to help people read it. The very first set of tags you will see in the picture below is
 . This is not important and most HTML documents do not need this at the beginning so don't worry about it. It's just another thing that PageBreeze has added.